Fri, 19 Nov 2010 12:54 PM
Sun, 08 Aug 2010 10:53 AM
Cisco Fail
Michael Dale
I don't normally sell Cisco products, but one of my clients already has a full Cisco network, so for them we purchased an ASA5505 for a remote office.
Cisco have made a number of upgrades to the software of the ASA range and have really stuffed up a few sections.
- It took me about a month to get a new ASA5505 (the new 512mb version as the OS now needs more memory)! For some reason Cisco cannot manage their stock, they suck. Also the ASA5505 should have had 512mb to start with.
- Finally when the ASA5505 comes, it doesn't work! It doesn't even switch on. I don't think I've ever had a DOA Juniper product. I understand these things happen but it doesn't leave a good impression.
- The power connector is really bad, it is some stupidly small plastic thing that will no doubt break in the future.
Overall the ASA5505 is a good product, but they've done some stupid things with the range. I wouldn't recommend one over a Juniper SSG.
I don't know why companies always create shitty products, the Juniper SRX range is another fine example. The code base on the Juniper SRX is still buggy. Junos 10.2 should finally fix most of my issues with the OS, but really.
Fri, 29 Jan 2010 6:18 PM
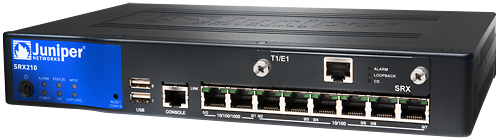
Juniper SRX210 Review
Michael Dale
Well I've finally had some time to finish off my review of the SRX210! It's only taken like 4 months. There is still some things missing from this review that I will post about at some stage.
- SSG20 has two mini-pim slots (for ADSL modules etc)
- SSG20 loses two of the ethernet ports the SSG5 has
- SSG20 is physically larger
- SRX210 has 100mbit more routing throughput (750mbit)
- 2 gigabit ethernet ports
- Express card slot for 3G modems
- 1 mini-pim slot
- plus some other software things (increased session limit, max policies etc)
- The SRX100 models all have 1GB of ram installed, yet the base version has a software licensing limitation of 512mb.
- You cannot upgrade a base SRX210 to 1GB as the base version only has 512mb of fixed memory.
- 3G WWLAN (SRX210 only)
- Significant routing performance increase
- JunOS
- Gigabit ethernet on smaller devices (from SRX210 upwards)
- PoE options (SRX210)
- Jflow/Netflow support
- Usable web interface (more on this later)
- Integrated ADSL and wireless options
- Auto Connect VPN (probably will be fixed in a software update)
- Other minor feature differences
- It's slow, much much slower to load that ScreenOS
- It seems to expire my session and log me out while in the process of doing stuff
- It doesn't feel like it was designed for people to actually use. It is basically a graphical representation of the configuration file. I've noticed that I expect different things from a web interface verses a command line interface.
Sun, 17 Jan 2010 11:10 AM
Native IPv6 over PPPoE with Internode and a Juniper SSG5
Michael Dale
Internode released a trial of native IPv6 over ADSL a few months back, so anyone with an ADSL account with them can try it.
So one of my clients has an SSG5 and an internode connection so I thought I'd set it up.
So the setup:
- ADSL modem in bridge mode
- SSG5 running ScreenOS 6.3.0r2 (I had some issues with 6.2, so it is best to use the latest OS)
The very first step is to enable IPv6 on the SSG5, this requires you to run the following command and then restart/reboot the device:
Once done you should now have access to all the IPv6 functions in the WebUI.
The next step is to modify your PPPoE connection settings.
set pppoe name "Internode" username "username@ipv6.internode.on.net" password "encryptedpassword"
set pppoe name "Internode" ppp ipv6cp ipcp
Now you need to enable IPv6 on the interface that the PPPoE connection is setup on.
set interface "ethernet0/0" ipv6 mode "host"
set interface "ethernet0/0" ipv6 enable
set interface ethernet0/0 ipv6 ra accept
unset interface ethernet0/0 ipv6 nd nud
So the above should be enough for you to get the /64 on the PPPoE interface.
Internode is currently handing out a /60 for use in your network (via DHCPv6), so lets now set that up.
set interface ethernet0/0 dhcp6 client
set interface ethernet0/0 dhcp6 client options rapid-commit
set interface ethernet0/0 dhcp6 client options request pd
set interface ethernet0/0 dhcp6 client pd ra-interface bgroup0
set interface ethernet0/0 dhcp6 client enable
In the above "bgroup0" is my LAN interface.
Now let's get IPv6 running on "bgroup0"
set interface "bgroup0" ipv6 mode "router"
set interface "bgroup0" ipv6 ip 2001:44b8:7763:baa0::1/64
set interface "bgroup0" ipv6 enable
set interface bgroup0 ipv6 ra link-address
set interface bgroup0 ipv6 ra transmit
unset interface bgroup0 ipv6 nd nud
In the above the IPv6 address there is my first /64 out of the /60, I've manually set it to a :1 address but you can use whatever it's default auto assigned address is.
Now you might want to hand out internodes IPv6 DNS server addresses to your LAN
set interface bgroup0 dhcp6 server
set interface bgroup0 dhcp6 server options dns dns1 2001:44b8:1::6
set interface bgroup0 dhcp6 server options dns dns2 2001:44b8:2::6
set interface bgroup0 dhcp6 server enable
Now we need to setup the default IPv6 route, as the one that is added by default is incorrect.
set route ::/0 interface ethernet0/0 gateway ::
And finally the IPv6 policy to allow traffic out (yay no NAT).
set policy id 12 from "Trust" to "Untrust" "Any-IPv6" "Any-IPv6" "ANY" permit log
That should be all you need to do to get IPv6 working on your network.
There is more information over at the internode site if needed.
And here is a traceroute from a computer on the LAN
C:\Users\Administrator>tracert -6 ipv6.google.com
Tracing route to ipv6.l.google.com [2001:4860:c004::68]
over a maximum of 30 hops:
1 1 ms <1 ms <1 ms 2001:44b8:7763:baa0::1
2 37 ms 37 ms 37 ms loop0.lns6.syd7.internode.on.net [2001:44b8:b070::4]
3 37 ms 37 ms 37 ms gi1-1.cor2.syd7.internode.on.net [2001:44b8:b070:5::1]
4 37 ms * 37 ms gi6-0-0-146.bdr1.syd6.internode.on.net [2001:44b8:b060:146::1]
5 37 ms 37 ms 37 ms 2001:4860:1:1:0:1283:0:2
6 38 ms 38 ms 39 ms 2001:4860::1:0:9f8
7 184 ms 295 ms 174 ms 2001:4860::1:0:165
8 175 ms 175 ms 175 ms 2001:4860::1:0:890
9 181 ms 176 ms 182 ms 2001:4860::29
10 185 ms 176 ms 244 ms tx-in-x68.1e100.net [2001:4860:c004::68]
Trace complete.
Sun, 03 Jan 2010 9:43 AM
Intel Matrix Raid is Bad
Michael Dale
So we've got two computers in the house using Intel Matrix raid.
First our server is using it for our Raid 1 boot drive, and my old desktop (just upgraded to an i7 iMac) was using it for its Raid 5 boot drive.
From what I've found, if WIndows crashes or isn't shutdown correctly the Raid will require rebuilding, both these systems do it. While it is rebuilding the performance is awful. It also takes up to 24hrs on our server to rebuild the array.
The other thing I have found is that the write performance on the Raid 5 drives is really really slow. My desktop was running it, bad idea I should have just stuck to a single drive, there was no real reason for using Raid.
Both systems aren't bad/slow (Q6600s with 8 and 4gb ram). We've also got a Raid 5 in the server running off a RaidCore PCI-X card and it is great. Never needs to rebuild and it is quick.
So yeah not surprising that the RaidCore actually works well but I didn't think Intel Matrix raid would be so bad...
Thu, 13 Aug 2009 6:52 PM
Jflow on SRX210
Michael Dale
We'll I've got my Juniper SRX210 up and running and it supports some stuff the old SSG didn't (it is also missing a few features too).
One of the new features is the support for JFlow (which is the Juniper version of Cisco's NetFlow).
Basically it means that the firewall can log traffic to a server in a format that allows for graphs such as this:
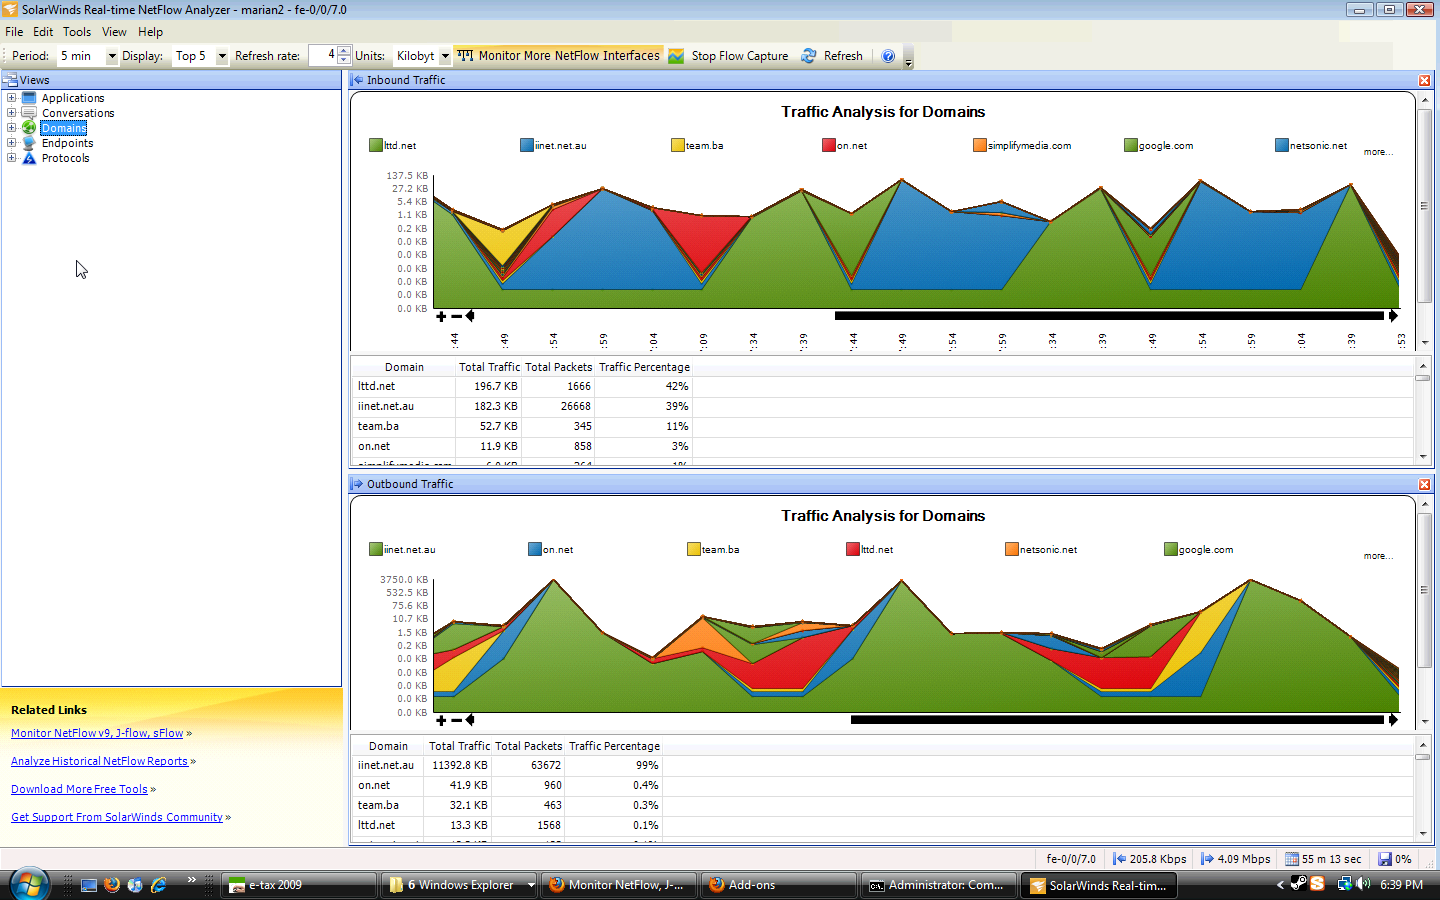
Pretty cool. Anyway the documentation for the SRX isn't that great, so here is my configuration for this (running SRX JunOS 9.6):
fe-0/0/7 {
unit 0 {
family inet {
filter {
input cflow;
output all;
}
address 203.206.210.249/29;
}
}
}
firewall {
filter all {
term all {
then {
sample;
accept;
}
}
}
filter cflow {
term 1 {
then {
sample;
accept;
}
}
}
}
forwarding-options {
sampling {
input {
rate 1;
run-length 0;
max-packets-per-second 50000;
}
family inet {
output {
flow-server 203.206.210.250 {
port 2055;
version 5;
}
}
}
}
}
Wed, 22 Jul 2009 9:40 PM
New Router/Firewall Time! Juniper SRX 210
Michael Dale
We'll I've had my SSG 5 for about 2.5 years now and it has worked great, and will probably keep working for many years to come. But Juniper have released a new/replacement model (kind of, they're still selling the SSGs) that runs JunOS.
So I thought it was about time to learn the operating system as ScreenOS (OS on the SSG) will eventually be discontinued.
The SRX 210 is really more of a replacement to the SSG 20, but it looks there isn't a SSG 5 replacement (yet at least, I did see some mentions of an SRX 100).
Anyway hopefully I should get it next week and then I'll do a review of it.
Fri, 17 Jul 2009 11:49 PM
New Job
Michael Dale
I have a new job at Digital Pacific (a sydney based web hosting company) as their Network Engineer.
I have only been there two days and my desk is already filled with networking gear :)
Fri, 20 Feb 2009 12:45 PM
Macbook Pro
Michael Dale
I upgraded from my white macbook the other day (10 days ago :p) to a MacBook Pro 15" (base spec: 2.4GHz, 2gb Ram, 250gb HDD, Geforce 9600 256mb).
I picked it up from the online apple store for $AU2699 (refurbished model, but in perfect condition) and it is great. The screen is much better than the old macbook and it can play some games too.
I'm currently dual booting Mac OS and Windows 7 Beta.
Sun, 18 Jan 2009 2:01 PM
PowerBook G4
Michael Dale
I just picked myself up an old PowerBook Ti off ebay (yes I like collecting random old stuff), and I was surprised how fast it was.
Specs:
- G4 800MHz
- 512mb PC133
- Radeon 7500 32mb
I installed Leopard on it via Firewire (off my iBook G4) and it works really well. The screen is great and it is more than fast enough to browse the internet on with multiple tabs.