Mon, 07 Apr 2014 9:45 PM
Networking Lab
Michael Dale
My current networking lab setup for testing a new network design including OSPF, BGP & IPsec route based VPNs.
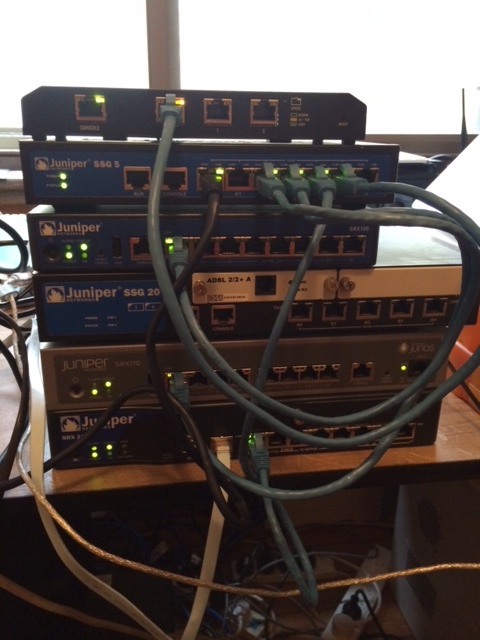
From top to bottom:
- The imposter, a Ubiquiti EdgeRouter Lite!
- Juniper SSG 5 (extended license
 )
) - Juniper SRX 100 (base memory
 )
) - Juniper SSG 20 (not currently being used)
- Juniper SRX 110H (older 1GB ram model)
- Juniper SRX 210H-POE (pretty old slow beast with 1GB ram and a lowly 400MHz CPU). I still run a standard 210H at home, one day I'll get the 210H2....
Thu, 21 Feb 2008 12:09 PM
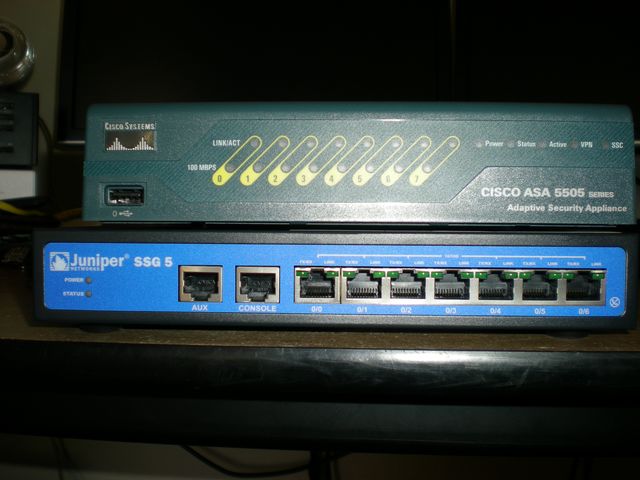
Cisco ASA 5505 vs Juniper SSG 5
Michael Dale
I thought it was about time I did proper review of the Cisco ASA 5505 and the Juniper SSG 5.
Both devices are at the low end of firewall security devices offered by Cisco and Juniper.
The ASA 5505 is part of Cisco's new range of Adaptive Security Appliances (ASA) the replacement for the PIX. The 5505 replaces the old PIX 501 and 506e.
The SSG 5 is Juniper's lowest end Secure Services Gateway (SSG). The SSG 5 replaces the old Netscreen 5GT.
There are many models of the SSG 5 and ASA 5505 available, for this review I will be looking at the non wireless SSG 5 256mb version and the unlimited user ASA 5505 K9 version.
Before we get started I should make it clear that I work with the Juniper range of hardware every day; so I may be bias.
Overview
The first thing I'll do is compare the two devices "on paper".
| Cisco ASA 5505 | Juniper SSG 5 | |
| Model | ASA5505-UL-BUN-K9 | SSG-5-SH SSG5 RS-232 256MB |
| RRP* | $AU1,681.90 inc GST | $AU1,125.00 inc GST |
| Firewall Throughput | 150 Mbps | 160 Mbps or 90 Mbps of IMIX** traffic |
| VPN Throughput | 100 Mbps | 40 Mbps |
| Sessions | 10,000 | 8,000 |
| Connections/Second | 4,000 | 2,800 |
| Packets Per Second (64 byte) | 85,000 | 30,000 |
| IPSec Tunnels | 10 | 25 |
| SSL Tunnels | 2 | N/A |
| Memory | 256 MB (upgradable) | 256 MB |
| Flash | 128 MB (upgradable) | 64 MB (fixed) |
| Ethernet Ports | 8x100 Mbps (2 of which are PoE) | 7x100 Mbps |
| USB | 3xUSB 2.0 | 1xUSB 1.1 |
| VLANs | 3 (trunking disabled, DMZ Restricted) | 10 |
| OS | ASA 8.0(2) - ASDM 6.0(2) | ScreenOS 6.1.0r1 |
| Users | Unlimited | Unlimited |
| Routing Protocols | RIP v1/v2, OSPF, EIGRP | RIP v1/v2, BGP, OSPF |
| Anti-Virus | No (possible future) | Yes (paid for subscription) |
| Deep Inspection | Yes | Yes |
| Anti-Spam | No (possible future) | Yes (paid for subscription) |
| Console | RJ45 | RJ45 |
| Dialup Modem | No | No (external modem can be connected via the AUX port) |
| IPv6 | Yes | Yes |
* RRP based on Ingram Micro's pricing
** IMIX traffic is more demanding than a single packet size performance test and as such is more representative of real-world customer network traffic.
The IMIX traffic used is made up of 58.33% 64 byte packets + 33.33% 570 byte packets + 8.33% 1518 byte packets of UDP traffic.
So on paper the ASA 5505 has much better throughput and general hardware specifications, yet the SSG 5 supports more VPN tunnels, VLANS and has full UTM (Unified Threat Management).
The ASA 5505 is also about 50% more expensive (based on the retail prices), saying this wholesale prices of the two devices only differ by about $250 ext GST.
Cisco ASA 5505 out of the box
The ASA 5505 comes with the following:
- ASA 5505
- Power Supply
- Getting Started Guide (Software Version 7.2)
- Rollover console cable
- 90-Day Hardware Warranty
- Software and Documentation CD (Software Version 7.2)
- Regulatory Compliance and Safety Information Booklet
- 2 Ethernet Cables
Juniper SSG 5 out of the box
The SSG 5 comes with the following:
- SSG 5
- Power Supply
- Serial to RJ45 connector
- 1-Year Hardware Warranty
- 90-Day Software Warranty (from the date of shipment)
- Free download of the latest ScreenOS for the first 90-Days
- Software and Documentation CD
- 1 Ethernet Cable
- Desk Stand (allows the SSG 5 to stand upright)
The 90-Day software download for the Juniper device means that you can have to the latest software when you first purchase the device. Unfortunately this time period starts from when the device leaves Juniper. So if you purchase the device from a reseller the software update period may have already expired. This is still better than Cisco that requires you to purchase a SmartNet agreement before you can download anything.
The 90-Day Cisco hardware warranty is also a bit rude.
Cisco ASA 5505 Starting it up
Out of the box the ASA is setup with Ethernet0/0 being the WAN side while the rest of ports are setup as the LAN side. The default IP address of the box is 192.168.1.1.
If you're running an internet connection where an ip address is handed out via DHCP then the ASA will give you basic internet access straight off, although most of the time you'll want to configure PPPoE or something.
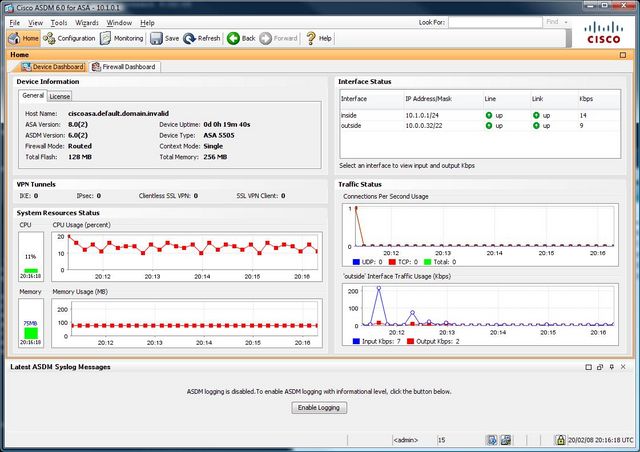
For users who have not used Cisco gear before then the easiest way is through ASDM (Adaptive Security Device Manager), cisco's GUI setup interface. To access this browse to https://192.168.1.1/ and download the ASDM.
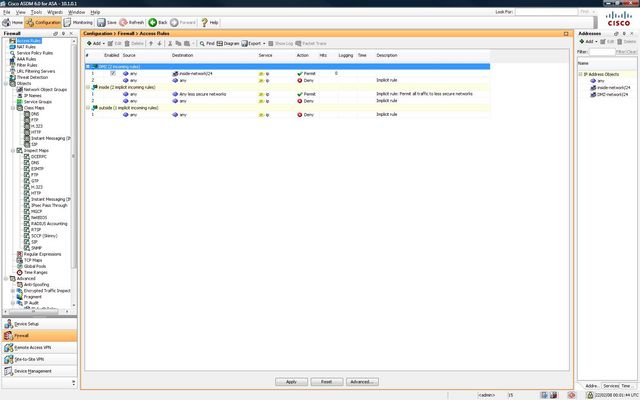
Once started you are greeted with some statistics of the ASA.
ASDM is up to version 6 and is it now fairly comprehensive; if you don't like the command line then most of the configuration can be done here.
By default the ASA blocks and filters certain traffic for example ICMP is blocked.
Juniper SSG 5 Starting it up
Out of the box the SSG 5 is setup with Eth0/0 being the WAN side, Eth0/1 being the DMZ and the rest of the ports being the LAN side. The default IP address of the box is 192.168.1.1.
The SSG 5 uses zones.
"A security zone is a collection of one or more network segments requiring the regulation of inbound and outbound traffic via policies. Security zones are logical entities to which one or more interfaces are bound."
So what Cisco call VLANs (or Security Levels) are basically what Juniper call Zones.
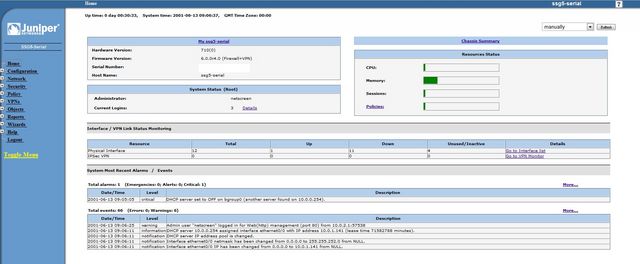
The SSG is managed through a web interface this can be found at http://192.168.1.1 (default username and password: netscreen).
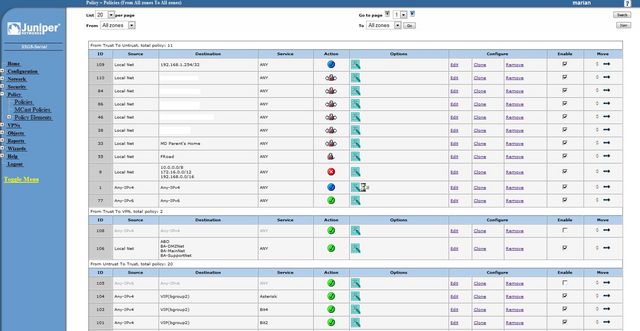
Once you've logged in you are greated a general overview of the device.
Like the cisco device the SSG also allows configuration via the command line; although the WebUI is much more complete than the Cisco ASDM.
Personally I do most of my configuration in the WebUI.
By default all outbound traffic is allowed and the WAN interface (or Untrust as Juniper call it) is set in NAT mode. The Untrust interface isn't setup to receive an address via DHCP by default.
Cisco ASA 5505 The Hardware
The physical construction of the 5505 is very good. The outside casing is mostly plastic, while the base of the system is metal. The only point of concern is the power connector; it seems a bit flimsy and could be easily broken.
If you open up the 5505 you can see that both the flash and ram is upgradable. The flash is just a standard compact flash card, while the ram is PC3200 DDR UB NON-ECC CL3 DIMM 2.5v or 2.6v. It looks like the ASA 5505 can support up to 512mb of Ram.
The primary CPU is based on an AMD Geode chip, plus there is a hardware acceleration chip too (for VPN encryption etc).
The 5505 also has a Security Services Card slot allowing extra functionality to be added on. Although there are not any cards at this stage.
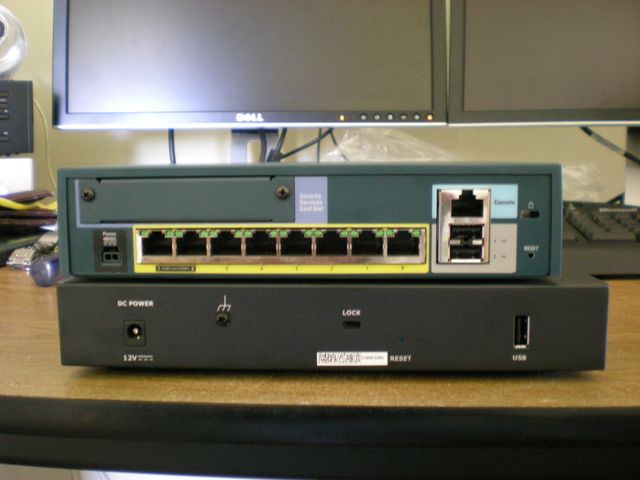
There are 2 USB 2.0 ports on the back and 1 on the front. Seems like a lot for a firewall! At this stage they don't do anything.
The inclusion of two Power over Ethernet ports is a great idea as it allows you to simply plug an IP phone in without the need for an extra power brick.
There is an internal battery that can be replaced if required.
Overall the ASA 5505 feel like it was built to last.
Juniper SSG 5 The Hardware
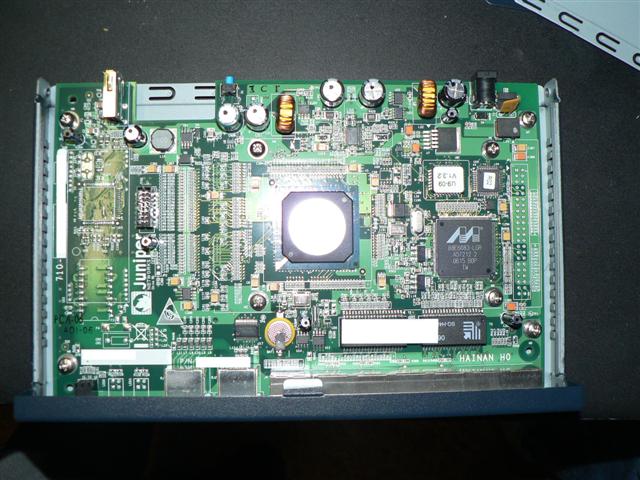
The physical construction of the SSG 5 is good, but it isn't has good as the 5505. My main point of concern is the single USB port on the back. It isn't attached to the outside casing and just feels a bit flimsy.
The SSG 5 allows for the memory to be upgraded, although 256mb is the max. I tried a 512mb DDR2 SODIMM in the device but it didn't boot. It is possible that I was using the wrong type of ram (on second look it may need DDR1). The flash memory is soldered onto the board and cannot be replaced.
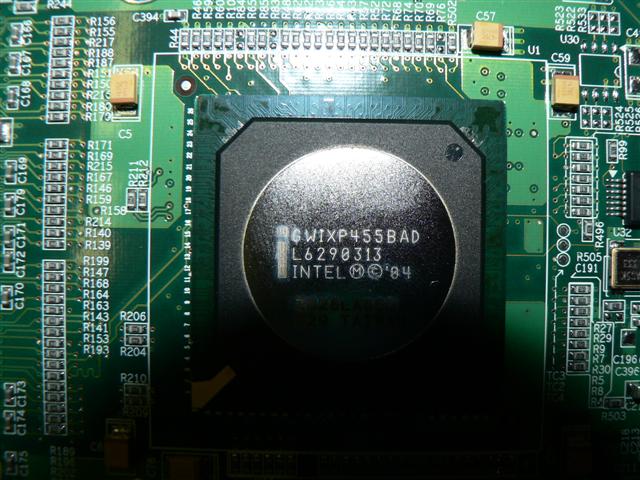
The SSG 5 uses an Intel IXP455 chip running at 533MHz.
There is a single USB 1.1 port on the back of the device that can be used for storing log files or other firmware.
Cisco ASA 5505 The Software
At the time of writing software version 8.0(3) is currently the latest version for the ASA. Unfortunately I currently only have 8.0(2), saying this the differences should only be bug fixes.
The ASA software is simply a continuation of the PIX software. The configuration is stored in a single text file. With each version of the ASA/PIX software the command line configuration is slowly becoming more and more like Cisco IOS which is not a bad thing.
The ASA has a stack of features for a device so small and cheap. It does everything that the PIX 506e does (IPsec VPN, SPI firewall etc) plus more (SSL VPN, EIGMP). The inclusion of SSL VPN means that this device can easily support teleworkers that may not have access to an unrestricted internet connection. SSL VPN gives the end user an option of a client based connection (similar to an IPsec VPN) or a clientless connection (a web portal to published files and services).
The ASA 5505 also provides basic routing and nat functionality, meaning that you can run this device without a separate router. Unfortunately there is no option for an integrated ADSL modem, so a modem will need to be purchased.
The configuration of the ASA can be scary for new users. ASDM is not particularly well laid out. NAT rules are in a different location to access rules and everytime you want to make a change you must save and upload the configuration again. The base license is also restrictive, you are limited to three "zones": untrust, trust and dmz. You cannot create pin holes in the DMZ to allow access the the Trust network either.
The SSL VPN is also very limited as you are only allowed 2 SSL VPN connections. IPsec is a little better with 10 tunnels allowed, but even cheap SOHO routers can do 10 IPsec tunnels.
All of these limits can be removed or increased with more expensive licenses, but they are much much more costly.
It is possible to get the ASA 5505 in 10 and 50 user versions (number of computers using the internet behind the ASA). Why Cisco have this limit is beond me. I've never seen a cheap SOHO router with a user limit.
The reporting options in ASA 5505 are fantastic. If you want to know what is going on it your network then the ASA will tell you. It can display the most used services, sources or destinations in a pie chart (plus a whole stack of other options).
Overall the ASA software is good, but there are far too many limits on the base 5505.
ASA Software Version 8.1 is due soon although I've yet to hear what extra features it will include.
Juniper SSG 5 The Software
The SSG 5 came out with ScreenOS 5.4 but since then Juniper have released 6.0 and 6.1 both adding lots of extra functionality. ScreenOS supports just about any routing protocol (BGP, OSPF, RIP etc) and has some really nice features that aren't found on the ASA 5505.
The base SSG 5 license supports unlimited users, 25 VPN tunnels and 10 zones. The extra zones really makes the SSG 5 stand out. For example you can have a Untrust, Trust, DMZ and VPN zone. All VPN tunnels can be bound to the VPN zone, separating it from internet traffic. There are also no limits on how the zones work so the DMZ can talk to the any zone if you so wish. With 10 zones every port on the SSG 5 can be part of a different network. So if I wanted to add a wireless access point I could create a zone that only allows the wireless users to access the internet.
Policy management is also much better than the ASA. Every change made via the web interface is automatically saved. You can quickly disable policies and move them around. You can fine tune each policy. For example you might want to enable NAT on a policy, or add anti-spam scanning on certain incoming SMTP connections. The policy management on the SSG 5 feels much more mature.
Again the SSG 5 like the ASA 5505 can be used as a stand alone device without the need for an extra router. The SSG 5 does have another nice option, you can purchase them with ADSL2+ modems built in (or ISDN or 56k modem). So you don't need to buy an extra modem. Saying this I find it easier and cheaper just to use an external modem as it can be upgraded if a new technology comes out.
ScreenOS 6.0 added Auto Connect VPN which works the same as Cisco's Dynamic Multipoint Virtual Private Network. This basically means that in a hub and spoke vpn setup the spoke sites (remote offices) can automatically establish a VPN tunnel between each other (based on the rules at the hub) to reduce the traffic going through the hub. This can increase bandwidth and decrease latency.
ScreenOS 6.1 added IKEv2 the next version of the Internet Key Exchange protocol which is used in IPsec.
UPDATE: Power Adapter
Just thought I'd add a quick section on the power adapter.
The Cisco ASA 5505's power adapter is quite large and seems to make a bit of noise (more than the device itself).

Conclusion
Both devices are fantastic yet each have their own strengths and weaknesses. For example the SSG doesn't support SSL VPNs while the ASA doesn't support built in Anti-Virus or Anti-Spam.
I feel that the ASA 5505 is a little let down by its software and licensing limits. The reporting options in the ASA are much better then the SSG, but this doesn't make up for its other short comings. SSL VPN is nice but again far too limited with only 2 connections. The ASA 5505 hardware is clearly better than the SSG 5: PoE ports, USB 2, higher throughput.
On paper the SSG 5 isn't has good as the ASA 5505, yet the device is much less limited. I personally don't feel that the performance of the SSG 5 isn't an issue. These two devices are designed for small businesses and teleworkers, they're never going to see 150mbit/sec of traffic.
The SSG 5 comes with many more hardware options, you can even get a version with 802.11a/b/g wireless.
To me the SSG 5 makes a better router than the ASA 5505. While the ASA 5505 makes more sense for a business with teleworkers that require SSL VPN.
The SSG 5 can handle more VPN tunnels (up to 40 with an extended license) and has some technology that makes it better for site to site VPNs, such as running BGP over an IPsec tunnel.
If you're currently running a Cisco network stick to the ASA. Likewise if you're running a Juniper network use the SSG.
For new users you need to decide on what is important to you. Do you plan on using SSL VPN? Then get the ASA 5505. If you're just using IPsec or require some more complex networks/routing get the SSG 5.
Value for money? The SSG 5 is better as there are far less software limits.
Thu, 31 Jan 2008 9:22 AM
Setting up a route based site-to-site vpn using aggressive mode
Michael Dale
The following howto guide explains how to setup a route based site-to-site VPN with one site using a firewalled internet connection and a dyanmic ip address.
So the background:
We have a client who is currently uses a Next G wireless connection who requires a link back into head office.
The wireless connection is limited in the follownig ways:
- No public ip address
- No static ip address
- No port forwarding capabilities
So the connection is locked down.
The client required a site-to-site vpn for their business to operate (main application is running in head office).
So the following guide will show you how to set this up.
Network Details:
Head Office
- Real internet connection with a static IP address
- 192.168.0.x internal network
Remote Office
- Internet connection without public ip address and/or port forwards
- 192.168.6.x internal network
Head Office Setup
- Create a new IKE user (Objects->Users->Local)
- Create a new Unnumbered Tunnel Interface mapped to the untrust zone (Network->Interfaces (List)) and connected to your untrust Interface
- Create a new "Dialup User" VPN Gateway (VPNs->AutoKey Advanced->Gateway),
- Dialup user being the one you created in step 1.
- Outgoing interface is your untrust port.
- Enter a preshared key.
- In the advanced settings:
- Mode (Initiator) Aggressive
- Enable NAT-Traversal
- Create a new AutoKey IKE (VPNs->AutoKey IKE).
- Security Level: Custom
- Remote gateway is the one you setup in step 3
- In the advanced settings
- Replay Protection
- Bind to the Tunnel Interface you created in step 2
- VPN Monitor
- Rekey
- Create Routes (Network->Routing->Routing Entries)
- Network (remote network): 192.168.6.0/255.255.255.0
- Gateway
- Interface: Tunnel Interface you created in step 2
- Create polcies:
- From Trust to Untrust:
- Source: 192.168.0.0/24
- Destination: 192.168.6.0/24
- From Untrust to Trust:
- Source: 192.168.6.0/24
- Destination: 192.168.0.0/24
- From Trust to Untrust:
Remote Office Setup
- Create a new Unnumbered Tunnel Interface mapped to the untrust zone (Network->Interfaces (List)) and connected to your untrust Interface
- Create a new "Dialup User" VPN Gateway (VPNs->AutoKey Advanced->Gateway),
- Local ID being the IKE Identity you created in step 1 on the Head Office setup.
- Outgoing interface is your untrust port.
- Enter a preshared key (same as Head Office setup).
- In the advanced settings:
- Mode (Initiator) Aggressive
- Enable NAT-Traversal
- Create a new AutoKey IKE (VPNs->AutoKey IKE).
- Security Level: Custom
- Remote gateway is the one you setup in step 2
- In the advanced settings
- Replay Protection
- Bind to the Tunnel Interface you created in step 1
- VPN Monitor
- Rekey
- Create Routes (Network->Routing->Routing Entries)
- Network (remote network): 192.168.0.0/255.255.255.0
- Gateway
- Interface: Tunnel Interface you created in step 1
- Create polcies:
- From Trust to Untrust:
- Source: 192.168.6.0/24
- Destination: 192.168.0.0/24
- From Untrust to Trust:
- Source: 192.168.0.0/24
- Destination: 192.168.6.0/24
- From Trust to Untrust:
So that should be all you need to do. The Remote Office will be the side that starts the VPN. Make sure the encryption settings are the same for each side.
The good thing about this setup is that you don't need to use a service like DynDNS so it should be a bit more reliable.
If I get a chance I'll try and add some screen shots.
Mon, 19 Nov 2007 10:15 AM
Recently the company I work for got another subnet to use, let's call it b.b.b.0/24 (and our current one is a.a.a.0/24).Creating a VIP in a different subnet
Michael Dale
We want to use this subnet to create more VIPs (Virtual IPs).
So we currently have:
a.a.a.2:80 -> 10.0.0.2:80
We wanted to add:
b.b.b.2:80 -> 10.0.0.3:80
Unfortunately trying to do this via the standard method fails with this error:

With the help of the juniperforum website a way was worked out.
Steps:
1) Make sure the new subnet is routed to your netscreen (in this case to our untrust int)

2) Create a new policy from UNTRUST to UNTRUST (yes this is not a mistake) with the following details:
Source Address: ANY
Destination Address: The external IP address you want to use i.e b.b.b.2
Service: The service you want
Under the advanced settings:
Enable Destination Translation
Translate to IP 10.0.0.3


3) To create more services to the IP address simply add another policy with the "Service" and "Translate to IP" details changed.
Note: This method mostly acts like a normal VIP. The only thing to look out for is that requests from the TRUST zone won't be translated.
More details can be found in the forum thread here.
Mon, 02 Apr 2007 5:54 PM
Thu, 08 Mar 2007 10:48 PM
IPsecuritas to Netscreen IPsec VPN
Michael Dale
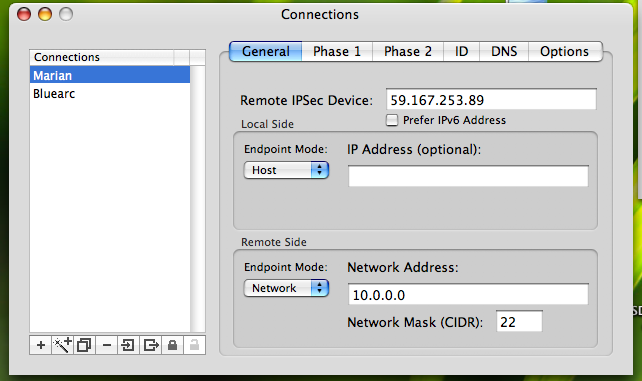
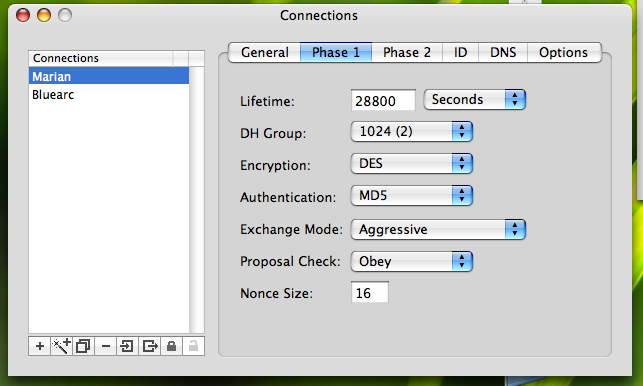
I took these screen shots a while ago, but I thought they may be useful.
Note: If you want to setup the netscreen side follow this howto (ignoring the last section about setting up Netscreen Remote).
This setup is only using DES/MD5 and not 3DES/SHA-1 with a 10.0.0.0/22 remote network. Your setup may be different to this.
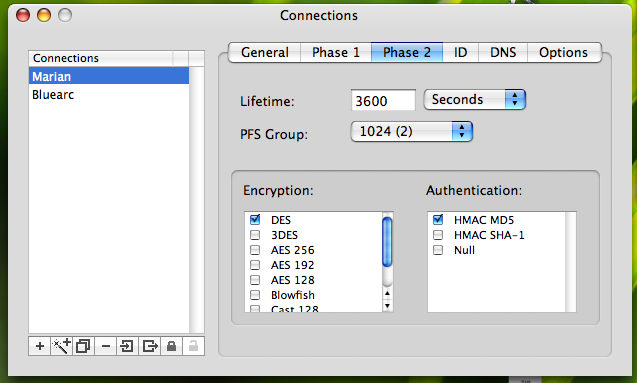
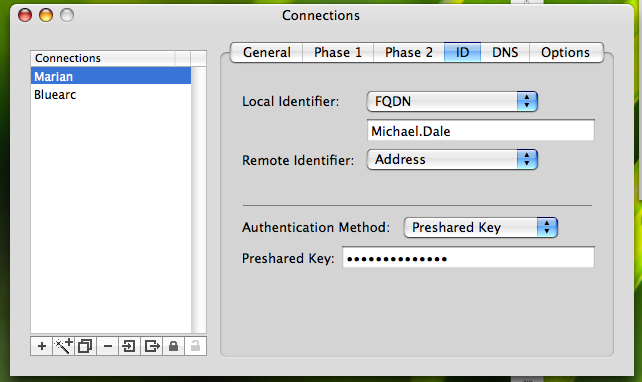
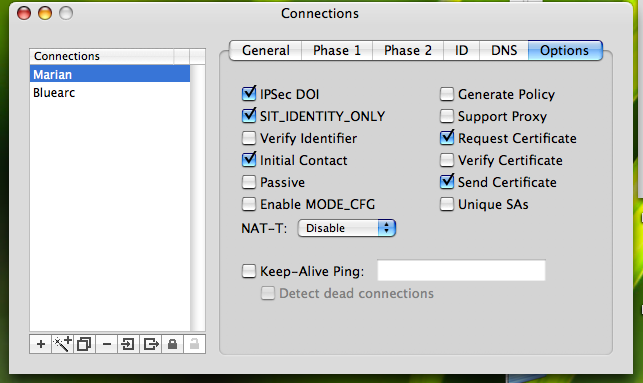
Thu, 15 Feb 2007 9:49 PM
I finally got an IPv6 tunnel going on my Netscreen SSG 5. So I thought I'd post the relevant configuration details here.IPv6 tunnel through IPv4 with a Netscreen
Michael Dale
I'm currently running ScreenOS 5.4.0r3a0; there seems to be some WebUI bugs with IPv6 so it is best to do it via the command line.
Update: I just got a response back from JTAC. IPv6 is only supported on the ISG2000. So I'm unsure when/if it the WebUI bugs will be fixed.
Update2: IPv6 is now supported on the SSG 5 under screenos 6, the WEBUI bug has been fixed.
Background info:
- Trust interface 10.0.0.254/22 - bgroup0
- Untrust interface - bgroup2
- IPv6 broker (broker.aarnet.net.au) - 202.158.196.131
- IPv6 subnet - 2001:388:c021::1/64
The first step is to enable IPv6 on your Netscreen.
Type the following then save your config and restart the device:
Now let's setup the trust interface:
set interface "bgroup0" ipv6 ip 2001:388:c021::1/64
set interface "bgroup0" ipv6 enable
unset interface bgroup0 ipv6 ra link-address
set interface bgroup0 ipv6 ra transmit
set interface bgroup0 ipv6 nd nud
So we've setup my trust interface with the IPv6 subnet and autoconfiguration should be working.
Now let's setup a tunnel interface for the traffic to run through:
set interface tunnel.1 ip unnumbered interface bgroup2
set interface "tunnel.1" ipv6 mode "host"
set interface "tunnel.1" ipv6 enable
set interface tunnel.1 tunnel encap ip6in4 manual
set interface tunnel.1 tunnel local-if bgroup2 dst-ip 202.158.196.131
Now we'll setup a static route for IPv6 traffic to go through:
And finally we need to setup a policy to allow traffic out:
set policy id 77
You may want to setup some policies to allow traffic in too.
That should be all you need to do.
Sat, 13 Jan 2007 9:58 PM
Juniper SSG 5
Michael Dale
We'll I finally got my new Juniper SSG 5 firewall (the replacement model for my old Netscreen 5gt).
I ordered it back in November, originally I was going to get the wireless version but they were still out of stock early this year so I ended up getting the base model (with 256mb of ram).
The main reason for the upgrade was that we'd run out of VPN tunnels (the 5gt did 10). The new version supports 25, plus it upgradeable to 40.
The SSG also has the following advantages over the 5gt (I'm comparing the base model 5gt and SSG 5):
- 4000 sessions, up from 2000
- 25 VPN tunnels, up from 10
- Unlimited users, up from 20 (my 5gt has an upgrade to support 20 users)
- 7 ethernet interfaces, up from 5 (plus they aren't limited in terms of zones like the 5gt).
- DMZ support (we've just got a subnet so this should be useful)
- Support for ScreenOS 6 which should be out this year
- Faster (160mb firewall (from 75mb), 40mb VPN (from 20mb))
- 256mb Ram, up from 128mb
- 64mb Flash, up from 32mb
So the device is pretty much double everything that the 5gt is.
It also cost me double. I got the 5gt off ebay for $320, where as the SSG 5 new cost me $640. I got a really good price on it has Bryn was able to sign up as a Juniper reseller, the SSG 5 is about $1200 retail.
The main limitation of the old Netscreen 5gt was the port modes.
The port mode defines what zone (untrust, trust, dmz etc) each ethernet interface is in. Any time you needed to change this you were required to reset the device and config (see below).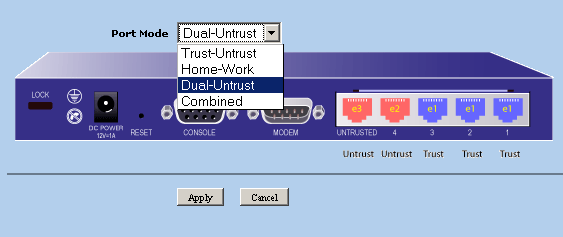

Where as the SSG 5 has something called bridge groups allowing you to easily change what zone each interface is in without resetting the device and/or config.
Much more useful if you're playing round with different network topologies (see below).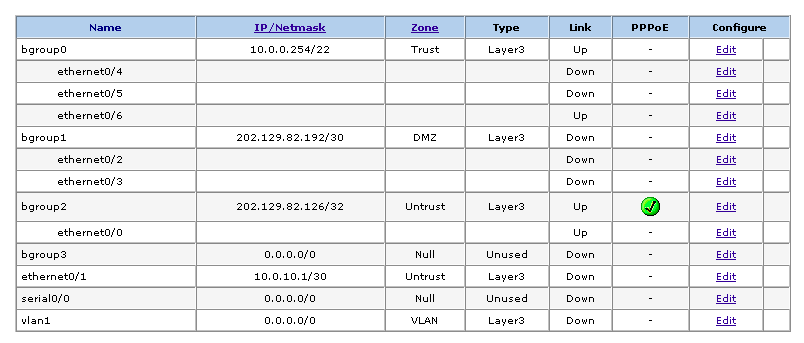
I've updated some of the IPSEC benchmarks to include both the SSG 5 and an old Netscreen 100 I picked up.
Sat, 23 Dec 2006 10:38 PM
The following howto will show you how to setup an extra subnet connected to a Netscreen.Setting up the Secondary IP option on a netscreen with a PPPoE connection.
Michael Dale
Background Info:
- Static IP address (202.129.82.126) on ethernet3
- /30 Subnet (202.129.82.192/30)
- 10.0.0.0/22 Internal Network on ethernet1
- Netscreen 5GT running ScreenOS 5.4.0r2 in Dual Untrust mode
- PPPoE connection
- Router address on 10.0.0.254
Adding an extra subnet gives us the option to run servers on separate IP addresses and bypass the Netscreen's limitation of range port forwarding.
Now what I've done for our connection is attach the extra subnet to our trust interface, the plan being that both the internal network (10.0.0.0) and the new subnet (202.129.82.192/30) can talk to each other.
Another issue is that that the 10.0.0.0 network needs to have a nat'ed connection, while the new subnet needs to be routed. All this is possible on the same interface with a few policy changes.
So Lets start. Please note that process will break your internet connection until all steps have been done.
1) Make sure that your external WAN interface is set to Route mode. This will break your current nat until we fix the policies.
This option can be found in:
Network > Interfaces > ethernet3 (name may be different) -> Edit

2) Now go to your internal LAN interface and check that it too is in route mode and that "Block Intra-Subnet Traffic" is off (allowing the internal interface to pass traffic back out the same interface (i.e. 10.0.0.0 -> 202.129.82.192)
Network > Interfaces > ethernet1 (name may be different) -> Edit

3) Add your Subnet on the internal interface
Network > Interfaces > ethernet1 (name may be different) -> Edit -> Secondary IP

4) Now we'll setup a policy so that any traffic from 10.0.0.0/22 gets nat'ed out of our static IP address
Policies -> From Trust to Untrust. The source address will be your internal network, destination address will be ANY and so will the service.

5) Click advanced and check "Source Translation", then click okay.

6) Now we'll setup a policy so that our new subnet can talk to the world.
In Policies -> From Trust to Untrust create a basic subnet any rule (of course you can restrict things if you'd like). You don't need "Source Translation" on this one.

7) Now to create a rule to allow traffic in to our new subnet
In Policies -> From Untrust to Trust create a basic any subnet rule (of course you can restrict things if you'd like). You don't need "Source Translation" on this one.

8) The last step is to allow traffic from the new subnet to talk to the internal network (this is an optional step).
In Policies -> From Trust to Trust. Source address being your new subnet and destination address is your local network.

Somethings I've noticed with this setup.
- You can still use VIPs on your main static ip address (202.129.82.126), so that gives you another IP to play with.
- The internal netscreen interface works on the network address for the /30 (i.e. 202.129.82.192) giving us two ip addresses that we can use for servers instead of just one.
Wed, 27 Sep 2006 7:07 PM
This howto shows you how to create a site to site VPN with a Netscreen and Racoon. If you're interested in setting up a dial-up vpn, see hereRacoon to Netscreen VPN (site to site)
Michael Dale
Background
My Place
- Netscreen 5GT running ScreenOS 5.4.0r1 (Should be the same process for any netscreen running ScreenOS 5.x)
- Local Network of 10.0.0.0/22 (10.0.0.0 - 10.0.3.255)
- External Address of 59.167.253.89
- Gentoo running Racoon (I think it was installed through the command emerge ipsec)
- Local Network of 10.0.11.0/24 (10.0.11.0 - 10.0.11.255)
- Dynamic IP Address (we setup a dyndns address as the Netscreen supports pointing to a hostname)
Site to Site VPN (Josh's network to my network)
Step 1)
Setup a dyndns address for the linux end (as this is using a dynamic ip address), use this address in the hostname option when setting up the netscreen (see next step).
Step 2)
The next step is to setup a site to site vpn on the Netscreen. I've covered this process here (only do Setting up the Netscreen, Note that example uses 10.0.4.0 as the remote network not 10.0.11.0).
Step 3)
Install racoon on the linux/bsd box (I'm not going to cover this as it is a different process for almost every distro, although most distros have some form of package management).
Step 4)
Setup racoon.conf. Now for this process we used a combination of:
- The details from this site: http://www.prolixium.com/netscreenlinux
- The config generated by IPSecuritas on my Mac
So our config looks like:
path certificate "/etc/ipsec.conf";
padding
{
maximum_length 20; # maximum padding length.
randomize off; # enable randomize length.
strict_check off; # enable strict check.
exclusive_tail off; # extract last one octet.
}
# Specification of default various timer.
timer
{
# These value can be changed per remote node.
counter 5; # maximum trying count to send.
interval 20 sec; # maximum interval to resend.
persend 1; # the number of packets per a send.
# timer for waiting to complete each phase.
phase1 30 sec;
phase2 30 sec;
}
remote 59.167.253.89 {
exchange_mode main;
doi ipsec_doi;
situation identity_only;
my_identifier address;
peers_identifier address;
verify_identifier off;
lifetime time 28800 seconds;
initial_contact on;
passive off;
proposal_check obey;
support_mip6 on;
generate_policy off;
nonce_size 16;
proposal {
encryption_algorithm des;
hash_algorithm md5;
authentication_method pre_shared_key;
dh_group modp1024;
}
}
sainfo address 10.0.11.0/24 any address 10.0.0.0/22 any {
pfs_group modp1024;
lifetime time 3600 seconds;
encryption_algorithm des;
authentication_algorithm hmac_md5;
compression_algorithm deflate;
}
#listen {
# isakmp 10.0.11.15;
#}
log debug2;
Things to note:
- remote 59.167.253.89 (The ip address of the external interface on my netscreen)
- exchange_mode main (Remember we set the Netscreen Phase 1 to main mode)
- my_identifier address; (The external IP address of the linux box is used as the identifier)
- lifetime time 28800 seconds (Phase 1 lifetime)
- encryption_algorithm des (Phase 1 DES encryption)
- hash_algorithm md5 (Phase 1 MD5)
- authentication_method pre_shared_key (We're using a preshared key)
- dh_group modp1024 (On the netscreen DH Group 2)
- sainfo address 10.0.11.0/24 any address 10.0.0.0/22 (From Josh's network to my network)
- pfs_group modp1024 (Again DH Group 2)
- lifetime time 3600 seconds (Phase 2 lifetime)
- encryption_algorithm des (Phase 2 encryption)
- authentication_algorithm hmac_md5 (Phase 2 MD5)
Setup ipsec.conf
So our config looks like:
spdflush;
spdadd 10.0.0.0/22 10.0.11.0/24 any -P in ipsec esp/tunnel/59.167.253.89-10.0.11.15/require;
spdadd 10.0.11.0/24 10.0.0.0/22 any -P out ipsec esp/tunnel/10.0.11.15-59.167.253.89/require;
You'll just need to change the IP addresses to suit your setup.
Step 6)
Setup psk.txt.
So our config looks like:
So change the ip address to your netscreen external interface and change the preshared key to the one used when setting up the netscreen
Step 7)
Test. Use both ends to debug and test.
